Thursday, August 26, 2021

Chic Pom-Pom Coaster - Free Coaster Crochet Pattern

Hello my crafty friends, I hope you are having a wonderful day and are excited for today's free crochet pattern! As some of you may know, I recently created a Fairly Country Table Runner pattern that has super cute pom-poms hanging at the edge of the table runner. I honestly had such an amazing time creating those pom-poms that I wanted to incorporate them into my next pattern. 
 
So, I ran to my yarn closet, looked to see what caught my attention, and a vibrantly blue cotton yarn was calling my name. As I sat down in my office chair, I realized that the cup I was drinking from was leaving a water mark on my desk, that is when the idea of a coaster came to mind.


The Chic Pom-Pom coaster starts off as a continuous circle, then the edge is created with a blend of slip stitches and the pom-pom to give it a beautiful detailed look. This coaster is perfect for both cold and piping hot beverages. I love these coasters so much that I will be creating them in groups of four for my upcoming crafts fairs. 
 
Now lets get into this fun pattern and cannot wait to see how yours turn out too!

Notes:

  1. For this pattern, make sure to work in continuous rounds which will result in no visible seams. Do not slip stitch after each round. 
  2. The specific yarn used for this Chic Pom-Pom Coaster was the Premier Just Cotton Yarn
  3. The tags are from IChestnut Faux Leather Tag .85" x 2.75"
  4. This pattern is for personal use only. Please do not sell this pattern as your own. Please feel free to sell the finished item and do give credit to Fresh Cut Yarn.
  5. If you would like to be featured on my instagram stories, please make sure to tag me @freshcutyarn
  6. If you will be selling these online, please do provide a link to my shop, thank you!
 
Materials:
Yarn Weight: 4-medium cotton yarn
Crochet hook 3.75mm
Tapestry needle
Faux Leather Tags


Abbreviations:

R= round

Ch= chain

Sc= single crochet

St = stitch

Sl st= slip stitch

Dc= double crochet

Tog= together 


Chic Pompom Coaster

Here we are beginning from the center of the coaster

R1) Work 6sc into a magic circle [6]


In R2-R8 you will be working on increases

R2) 2sc in each st, *6 [12]

R3) 1sc then 2sc in next st, *6 [18]

R4) 1sc in next 2st then 2sc in next st, *6 [24]

R5) 1sc in next 3st then 2sc in next st, *6 [30]

R6) 1sc in next 4st then 2sc in next st, *6 [36]

R7) 1sc in next 5st then 2sc in next st, *6 [42]

R8) 1sc in next 6st then 2sc in next st, *6 [48] 


Next you will be working on the pom-pom row, which will involve using a sl st into each st except where there was an increase in the prior row. When you reach the increase, in between that increase is where you will insert the pom-pom.

R9) You are going to sl st into each st until you reach an increase. In between the increase you will * sl st, ch4, dc5tog in the 3rd chain from the hook, ch3, dc5tog in the 3rd chain from the hook, then you are going to fold it in half which will create the pom pom, slip stitch the togs together. Next you are going to sl in the same st where you began the pom-pom which will close your pom-pom*, then you are going to continue your sl st along the row until you reach the next increase and you will create another pom-pom in that space. You will be doing this along the entire row. Once you are done, you should have a total of 6 pompoms


Now you are going to f/o, leaving an approximate 2 inch tail which you will knot off and hide the tail inside the coaster. While you work on this pattern and questions pop, I recommend either 1) adding your comment below, 2) email me at freshcutyarn@gmail.com, or 3) send me a direct message on instagram. If you do not have a question but still want to say hi, you are more than welcome to reach out to me through either option listed above.


Thanks again, I hope you have a wonderful day, and stay tuned for future free patterns!

Cindy 💖


Thursday, August 19, 2021

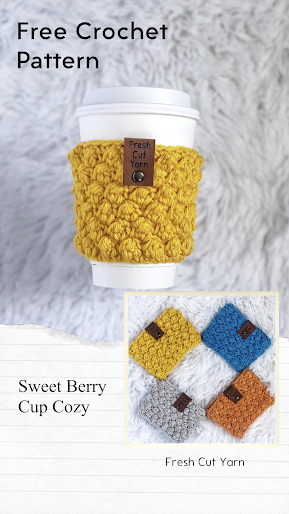
Berry Sweet Cup Cozy - Free Cozy Crochet Pattern

Being born and raised in Boston, autumn is my favorite. Call it the New England girl in me. I love seeing the leaves change into their vibrant colors, neighbors decorate their homes with different size pumpkins, and knowing that all of the yummy fall beverages are out (I am looking at you pumpkin spices latte) really brings so much happiness to my heart. As I started thinking about warm beverages, I really want the next free crochet pattern to be a cup cozy because it serves 3 important purposes:

  1. They protects your hand from a piping hot beverage
  2. They can be super cute and fashionable
  3. AND most importantly, they are reusable, meaning less use of paper and overall a great practice for our environment 
Next, I want this pattern to have very beautiful texture, one where no matter what color yarn you pick, you will still be able to see all of the intricate details. With that main goal in mind, I ended up finding the uneven berry stitch. This stitch is made from a cluster of loops that alternates with slip stitches, which helps in providing more definition to the berry. It really is such a beautiful design and helped inspire today’s free pattern, the Berry Sweet Cup Cozy.

Here we have the Berry Sweet Cup Cozy
on a medium Dunkin Donuts cup 

This pattern works perfectly for both a Starbucks cup, Dunkin Donuts cup, and other cups of that same size. Now let's have some fun and get into this pattern.

Notes:

  1. If you need a bit more guidance how to crochet the uneven berry stitch, I would recommend watching Knitiversity's uneven berry stitch video
  2. If you would like to add leather tags, I highly recommend IChestnut Faux Leather Tag .85" x 2.75" Knit hat tags, they are amazing! 
  3. This pattern is for personal use only. Please do not sell this pattern as your own. Please feel free to sell the finished item and do give credit to Fresh Cut Yarn.
  4. If you will be selling these online, please do provide a link to my shop, thank you!


Materials:

Yarn Weight: 4-medium (cotton yarn was used for this pattern)

Crochet hook 3.5mm

Tapestry needle

Scissors


Abbreviations:

R= round

Ch= chain

St= stitch

Sc= single crochet

Sl st = slip stitch


Berry Sweet Cup Cozy Pattern

Ch 32
R1) 1 sc in 3rd ch from the hook, 1 sc into each chain until you have completed the row

This is the part of the pattern where you will begin using the berry stitch
R2) Ch 1, turn your work, skip first sc, *1 berry st in next sc, sl st in next sc*, you are going to repeat this for the remainder of the row
R3) Ch 1, turn your work, skip first st, *sl st on top of next berry st, 1 sc in next sl st* repeat this until you have reached the end of the row
R4) Ch 1, turn your work, sl st into next sl st, *1 berry st into next sc, sl st in next sl st* repeat this part of the pattern until you have reached the end of the row

R5-R12 you will be repeating rows 3-5

R13) You will be repeating row 3, but instead of performing sl st, you will be performing a sc into each st, since this will be the top part of your cozy.
Next section of the pattern, you will be working on merging the sides together
One you have completed row 13, you next step is to merge the two sides of the cozy together. You have two options, and either option works but this final step is based on personal preference (I personally chose option 1 since I liked how the finished product turned out):
  • Option 1: You are going to cut a long tail and then you are going to sew the sides together. Once that is complete, make a knot to secure your work and hide the remaining tail into your work
  • Option 2: You are going to sl st the two sides together and once you are done, make a knot to secure your work and hide the remaining tail into your work

If you have a leather tag, you can add that wherever you think looks best and TA-DA!!! Congrats on creating your very own Berry Sweet Cup Cozy! Thank you so much for taking the time to check out my blog/pattern and I truly hope you had soooo much fun learning a new stitch, a new pattern, and creating something beautiful! 

If you ever created this pattern or any of my other patterns in this blog, please make sure to tag me on Instagram @freshcutyarn I love seeing your finished items and looking at all of the beautiful yarn you have selected!


While you work on this pattern and questions pop, I recommend either 1) adding your comment below, 2) email me at freshcutyarn@gmail.com, or 3) send me a direct message on instagram. If you do not have a question but still want to say hi, you are more than welcome to reach out to me through either option listed above.

Thanks again, I hope you have a wonderful day, and stay tuned for future free patterns!


Cindy 💖

Thursday, August 12, 2021

Fairly Country Table Runner - Free Crochet Pattern

Hello my crafty friends! Come and join me on this crochet pattern writing journey where you will learn new techniques and create wonderful items. Throughout my crochet journey, I have only focused on creating two of my favorite items, hats and amigurumi. 

However, as I continue writing patterns, I do want to go out of my comfort zone and create new items such as home decor, scarves, shawls, and blankets (just to name a few). I will be very honest, this pattern I am about to introduce you to has taken me a while to create due to 1) not using the correct yarn, 2) the count always being off, and 3) the item is either looking too skinny or just too much. BUT now, after conquering all of those obstacles, I am super excited to finally show you what I have been up to these past few weeks.

Today I would like to introducing you to the Fairly Country Table Runner! This table runner has a lot of fantastic detail to it and the best part is, you get to decide how long or how short you would like it to be. Store bought table runner are great but it can be a challenge determining if that table runner will work with the table you have in mind. But now you can create your own! This pattern uses the block and offset shell stitch which is such a beautiful design and once you get the hang of it, this should be a pretty easy item to make.

Alright lets get started with the beautiful table runner!

Notes:

  1. For this pattern, the specific yarn used was the Premier Yarns Cotton Fair Yarn
  2. This pattern is for personal use only. Please do not sell this pattern as your own. Please feel free to sell the finished item and do give credit to Fresh Cut Yarn.
  3. If you will be selling these online, please do provide a link to my shop, thank you!

Materials:

Yarn Weight: 2-fine

Crochet hook 3mm

Tapestry needle

Scissors

Measuring Tape


Abbreviations:

R= round

Ch= chain

St= stitch

Dc= double crochet

Tog = together


Fairly Country Table Runner


Ch 54

R1) Starting from the 3rd chain from the hook, 1 dc into each of the next 4 st, *skip the next 2 ch, 5 dc into the next st (you are placing all of those dc into the same st), ch2, skips 3 st, 1 dc into each of the next 5 st* you are going to repeat this pattern until you reach the end of the row


R2) Ch 3, turn your work, 1 dc into the next 4 sts, *skip the next 2 chain, 5 dc into the next st (this should be placed on the edge of the 5 dc set you created in the prior row), ch2, skip 4 dc, 1 dc into each of the next 5 sts. You are going to repeat this pattern until you reach the end of the row.


At this point all you have to do is repeat row 2 until you have decided how long you would like your table runner to be which honestly is one of the great things about this pattern. If you are envisioning this on your coffee table or your larger kitchen table, you get to decide the perfect length. 


Final Row) CH 3, turn your work, now you are going to add 1 sc to each st, and the area where you see a space as a result of the 5dcn in the previous row, you are going to add 2 dc in that space [53]


Fairly Country Table Runner Pom Pom Edgings (optional)


Now you have created your beautiful Fairly Country Table Runner, this is the point where you get to decide "should I stop here and quickly add it to my table or should I add that cute edging?" If you have decided that this is the perfect table runner for you, then go place it in your table and let me know how it look! However, if you like the cute pompom edging that is included in this pattern, then lets get to it!
 
Pom Pom Row
ch4, *ch3,  dc5tog in the 3rd chain from the hook, ch3, dc5tog in the 3rd chain from the hook, then you are going to fold it in half which will create the pom pom, slip stitch the togs together. Next you are going to ch 4, you are going to skip 6 stitches and slip stitch your chain* You will be repeating this for the rest of the row. Once you are done, you are going to leave a long tail and work that into the table runner.

Important note: for the other side of your table runner, I did the same steps as the Final Row and just added dc before adding the pom pom row.
 
If you are reading my directions and feeling a bit puzzled, I would highly recommend checking out Crochet with Clare's Crochet Pompom Edging Tutorial. She does a wonderful job in showing you how to create these cute pom poms! 


Thank you so much for joining me today and creating this beautiful table runner! If you have any questions or would like to leave a comment, please use the comment section below. Also, once you are done creating this table runner or any other of my designs, please make sure to tag on me on my instagram @freshcutyarn it truly brings me so much joy seeing you create my designs. I hope you have a great day and stay tuned for future patterns! 

Cindy 💖


Thursday, August 5, 2021

Mixed Cluster Stitch Pumpkin - Free Crochet Pattern

I am a huge fan of the fall season, especially when thinking about apple picking, cider donuts, and all the fall related crocheting. To start the season off, I wanted to share a pumpkin pattern with you which has a very detailed stitch while not being overly busy. Today I want to introduce you to the Mixed Cluster Stitch Pumpkin!

 I will admit, this one was a tough one to explain BUT I made sure to include additional resources to help you along the way, now lets getting into the pattern!

Notes:

  1. This pattern uses the mixed cluster stitch, I have provided the written version of how to make that stitch and also provided a YouTube video by Rich Textures Crochet 
  2. This pattern is for personal use only. Please do not sell this pattern as your own. Please feel free to sell the finished item and do give credit to Fresh Cut Yarn.
  3. If you will be selling these online, please do provide a link to my shop, thank you!

Materials:

Yarn Weight: 4-medium

Crochet hook 4.5mm

Scissors 

Tapestry needle


Abbreviations:

Ch= chain

Sc= single crochet

Dc= double crochet

MC= mixed cluster

Yo= yarn over

St = slip stitch 


Pumpkin

Chain 31

R1) Sc into second ch from the hook, then 1 sc in each st [30]


Starting in row 2, we will be working on the mixed cluster stitch. In order to perform MC stitch, you will need to do the following:

  • yo, insert your hook into the first st, yo, draw loop through, yo, draw through 2 loops, skip 1 st, yo, insert hook into next st, yo, draw loop through twice all into the same st, (6 loops on hook), yo, draw through all loops on hook. Once you have completed that step, you have offically created the MC stitch. 
  • Rich Text Crochet has a wonderful video that shows you how to crochet the Mixed Cluster Stitch, which you can access here


R2) ch 2, turn your work, 1 hdc in the same st as the ch 2, start the 1 MC in the same stitch as the hdc, skip 1 st, and your will end your first MC in the third st. Repeat the MC until you reach the end. In the last stitch finish with hdc.

R3) ch 2, turn your work, 1 sc in each stitch for the remainder of the row [30]


For the rest of the pattern you are going to repeat rows 2-3 and you will stop at row 48


Next you are going to f/o, leaving a very long tail, which you are going to use to sew both ends together. Once you have created a cylinder shape, you will sew one of the open ends of the cylinder together. Next, you will stuff your pumpkin and then you will sew closed the top part of your pumpkin


At this point I will need another long string, which will help shape your pumpkin. Using your tapestry needle, you will poke the top of your pumpkin and then the tapestry needle should reappear at the bottom of the pumpkin. You are going to repeat this around the entire pumpkin, which will help shape it. Finally, you will tie the ends together and hide those ends in your pumpkin. 


Stem

Chain 10

R1) Dc into second ch from the hook, then 1 dc in each st [9]

R2) Ch 3, dc in each stitch until the end of the round [9] 


Now you are going to leave a long tail and sew together the sides, which will turn into the stem of your pumpkin. Once that is done, you are will sew your stem to the top part of your pumpkin.


I hope you had an amazing time in creating this chic and fun mixed cluster stitch pumpkin. Let me know in the comments section below if you have any questions, want to provide feedback, or just want to say hi! I hope you have an amazing day and make sure to tag me on instagram! It brings me so much happiness see all your wonderful creations!


Cindy 💖